SSH (Secure Shell) and SFTP (Secure FTP) support a very strong security model that can be used instead of the normal username and password authentication scheme we’ve all come to know and love. It uses public key cryptography to create a different, more secure approach to authenticating your identity and your right to access a server or other resource.
In a nutshell, you will generate a public and private key pair. The public key will be placed on the server by your system administrator, giving you access. You will keep the file containing the private key in a safe place. You’ll log in by providing that private key file to your SSH- or SFTP-supporting client.
It really is that simple.
Become a Patron of Ask Leo! and go ad-free!

SSH and public keys
The easiest approach to creating a public / private key pair is to download and install PuTTY and then use the PuTTYgen tool. Once you have a key pair, keep the private key secure and give the public key to the administrator of the server to which you want to connect. Using it is as simple as specifying the location of your private key to the SSH or SFTP tool you’re using.
The private key is just that: private. You may put a password on it, but you don’t have to. Without a password, all you need is the file in order to log in. Or, to put it more clearly, all anyone needs is that file to log in as you. Obviously, if you password-protect the file, you’ll need both the file and the password to unlock it. In that case, logging in is very similar to what you do today: specify a username and a password to unlock your key file.
I’m aware of the following tools that claim to work with this technique.
- SSH Clients
- SFTP Clients
- CuteFTP Professional (not Home)
- CyberDuck & MountainDuck
- WebDrive
- WinSCP
- WS_FTP
Other tools may also work. The key terminology to look for is SSH, SFTP, and Public Key Authentication.
Personally, I make heavy use of PuTTY and MountainDuck.
Generating Your Keys
In general, it’s best to create your own key. That way, you control what happens to your private key, and no one else ever has to see it.
PuTTYgen
PuTTY is a free SSH client that includes a tool for generating keys called PuTTYgen. The tool can also be downloaded separately, but why bother? Just get the whole thing. PuTTY is my recommended SSH client.
When you run PuTTYgen, you’ll get a dialog with a “Generate” button on it.
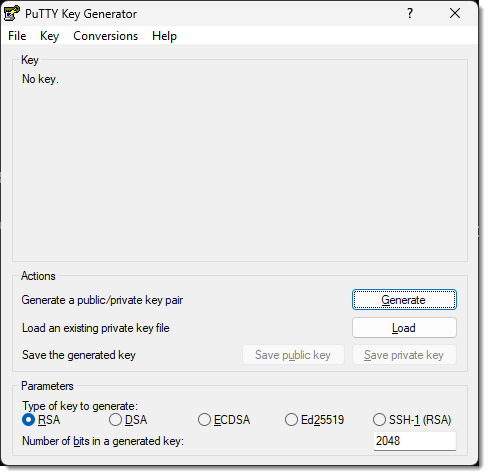
Click Generate.
It will ask you to move the mouse around to generate randomness. (Randomness is a key component of public key cryptography). Once that’s happened enough, a key will be displayed.

Next, you should do the following.
- Specify a passphrase. Technically, this is optional, but if you omit the passphrase, then anyone who can access your private key file can log in as you. You may or may not have enough security in place for this to be an issue. If you do specify a passphrase, you’ll need to enter it when you log in, similar to a normal login.
- Press the Save Public Key button to save the public key. I recommend saving as your name “.pub” (for public). For example, I would save “leo.pub”.1
- Press the Save Private Key button to save your private key. This saves the private key in PuTTY’s own format, a .ppk file. So, “name.ppk” might be appropriate.
- I also recommend hitting the Conversions menu and then Export Openssh key and saving that to “name.key”. This format will allow you to use your private key with other applications besides PuTTY.
Once you have your keys…
Send your public key to your system administrator via email (the key itself or the “.pub” file as an attachment). It will be put in all the right places2 to allow you to log in to all the account(s) you might need to.
Keep your private key in a safe place. You’ll need it each time you want to log in. If either key is lost, you will lose access until the key generation and installation process can be repeated. If they or the computer they’re on are stolen, tell your system admin immediately.
Using Your SSH Keys to Log In
Once your keys are generated and the public key installed on the server, you need to specify the private key to your SSH client in order to log in.
PuTTY
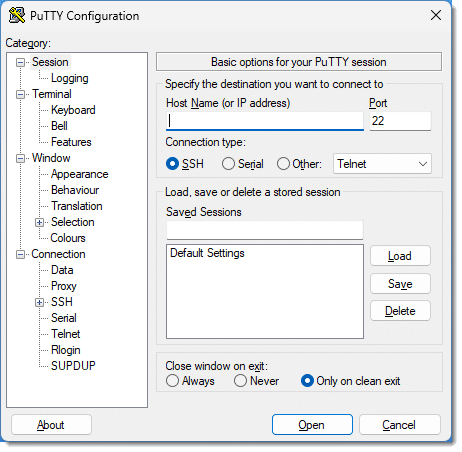
There are (at least) two approaches to using Public/Private keys with PuTTY. When you fire up PuTTY without any command line options, you get its standard configuration dialog. Here you enter the name of the server to which you want to connect.
On the left is a tree view of various options. Underneath Connection, expand SSH, expand Auth, and then click on Credentials. The dialog will then include a field labelled Private key file for authentication.
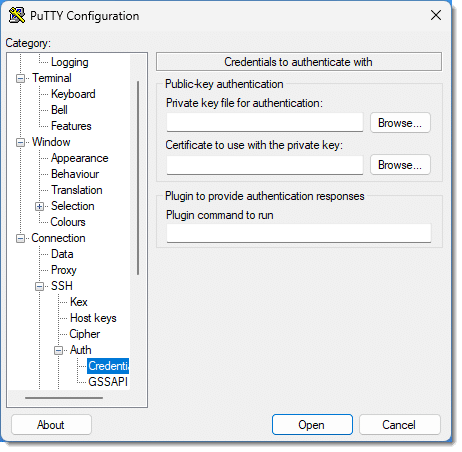
Specify the location of the .ppk file you generated with PuTTYgen. When you connect, if your private key is passphrase-protected, you’ll be asked for the passphrase.
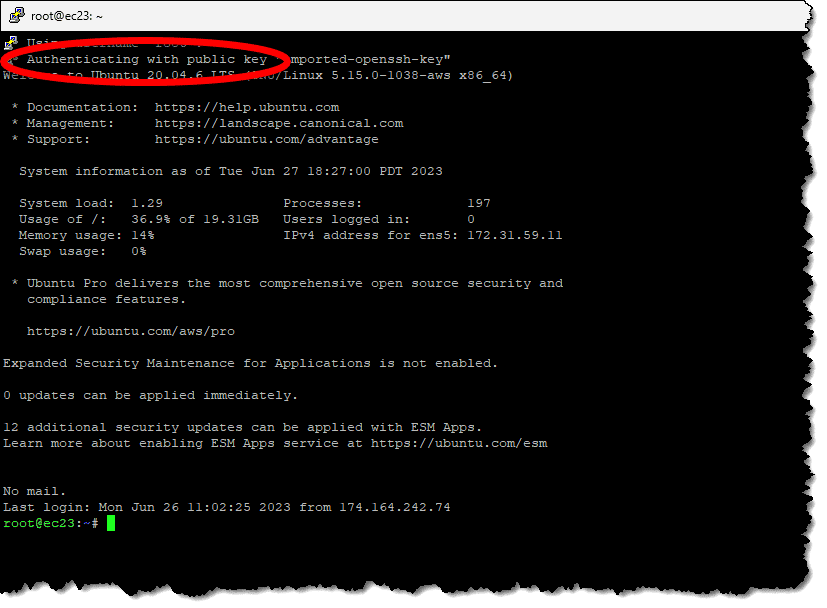
The other approach, and the one I use, is to create shortcuts for the various servers I connect to regularly and specify the location of the private key on the command line. For example:
PUTTY.EXE -i c:\somepath\leo.ppk leo@server.com
That, as a desktop shortcut or item on a Windows menu, connects to the named server using the specified account name “leo”, and uses the private key found in “c:\somepath\leo.ppk” to authenticate. Run that and there’s no additional step; the SSH window opens and signs you in. Here’s an example of connecting to the server currently hosting askleo.com, ec23.pugetsoundsoftware.com.
Using Your SFTP Keys
Secure FTP, or SFTP, is really just using SSH technology to provide FTP-like functionality. Since it’s using SSH, the keys you’ve generated and use for your SSH authentication work with many SFTP applications as well.
PSFTP
PSFTP is a command-line FTP program using SSH that’s distributed with PuTTY. More importantly, it supports public key SFTP by using the “.ppk” file that you created above for PuTTY. Connecting using a public key is simply a different set of comment line options:
psftp -l username -2 -i keys.ppk remotehost
- -l username specifies your username on the remote host. Following the example above, this might be “leo”.
- -2 indicates that PSFTP should use SSH protocol version 2.
- -i keys.ppk specifies the location of your private key as created with PuTTYgen. Again, from the example: “c:\somepath\leo.ppk”.
- remotehost is the name of the remote host you’re connecting to.
Once this technique is in place, running the command as shown above will connect without further prompting (except for any password placed on the private key).
Other FTP-like programs supporting SFTP/SSH have similar approaches to specifying the private key to be used.
Do this
Subscribe to Confident Computing! Less frustration and more confidence, solutions, answers, and tips in your inbox every week.
I'll see you there!
Podcast audio

Related Video


Footnotes & References
1: Unfortunately that’s also the file extension for Microsoft Publisher. If you have Publisher installed, note you’ll get Publisher icons when viewing the file in Windows File Explorer.
2: On Linux systems, this is typically the “authorized_keys” file in the “.ssh” folder for the account.

It seems as though sftp and ssh CAN NOT BE USED together.
When I invokes sftp (first) the server asks me to authenticate the public key then continues conneting.
Afterwards when I invoke ssh I receive a msg indicating the key is already present and it WILL NOT connect.
Any suggestions
It sounds like a configuration issue on your server side. I regularly do exactly what you describe without problems, on several servers.
Great article! I’m using FTPShell which requires the private key to be in the PEM format. Can I convert PuttyGen’s PPK output to PEM? If not, there another program that can generate a PEM formatted private key?
PuttyGen allows to export in different formats. I’ve done exactly that.
Using Putty Key Generator, if I choose “Save Private Key”, the only “save as” file type is ppk.
There are also two Conversion options, “Export OpenSSH Key” and “Export ssh.com Key” Neither of these options provide a specific file type such as PEM.
How does one generate a PEM formatted private key?
Hi,
Can u Please explain me
how can we use the keygen tool generate the public key authentication in unix so that i need to use that in the java programs
in Clear:
I am generating the key pair using keygen tool in unix and using that keys in java programs where it is failing.
can we use like this?
please clarify
Thanks & Regards
KR
how do i i add the public key on server side. if my machine is server how can i add the public key
Hi,
Do we have any open source to manage keys? Any open source to give certificate of authenticity?
Regards,
Vineet
Hi ive been researching on this topic for 3 days and now that im so close it seems to some what fustrating not to get the sftp server up and running as i would like.
My question is how should i add the public keys to my server? do i just copy and paste the text into the server end
“security certificate” in the allocated place for public keys and viseversa in the client end for the private keys etc?
please help
thanks
paul
—–BEGIN PGP SIGNED MESSAGE—–
Hash: SHA1
Public keys are placed in the file authorized_keys in the .ssh sub directory of
the account’s home directory. It’s definitely a particular format, a single
line:
ssh-rsa TypicallyLongPublicKeyValue
and probably needs a particular permission setting. I typically set the file
and the .ssh directory to be rw and rwx respectively for the owning account
only).
Leo
—–BEGIN PGP SIGNATURE—–
Version: GnuPG v1.4.6 (MingW32)
iD8DBQFGdsMBCMEe9B/8oqERAub9AJsF9n8oP/Hwd2IugrVjruLcaYrWywCeKFe8
ZSAhEqhBqNs8lMYiDLUrQBI=
=0GIJ
—–END PGP SIGNATURE—–
Thanks for posting this info. This is the first time I have needed to create and use a SSH key. I got everything set up and working well using Putty thanks to you. Much Appreciated!
Hi Guys,
Is there any sftp client that encrypt and decrypt files same as Core FTP Pro.
please help.
i want to use psftp command in script file as i need to get some file for FTP through .PPK file but problem is putty is not able recognise psftp command. i have tried setting path for psftp. what can be the reason ?
A note for anyone who has seen ‘server refused our key’ error: When you try using the key generated with puttygen, make sure to use the OPENSSH format key on the server side. openssh doesn’t understand the puttygen format of key.
Alternatively you can generate your key with ssh-keygen. More info here: http://www.walkernews.net/2009/03/22/how-to-fix-server-refused-our-key-error-that-caused-by-putty-generated-rsa-public-key/
Thanks a lot for the writeup… I am a beginner to SFTP and I am sure I came out a long way at the end of this doc… :)
Regards,
Zach
Hi,
My requirement is to receive files from a unix machhine(SFTP server) to a windows machine.I have already generated the public key and private key using puttygen.
I have generated the keys using a remote logon on the windows.Do the ID’s be same on the Unix and windows box or can I use the login credentials of the unix box in the psftpcommand line prompt.
Regards,
Vamsi
Hi,
I wanted to use SFTP as file transfer protocol using putty. I have created Public as private keys as per the above instruction.
But want to know how to use it?
Is one server will have only one private and public key or more than on keys?
Hi,
I wanted to use SFTP as file transfer protocol using putty. I have created Public as private keys as per the above instruction.
But want to know how to use it?
Is one server will have only one private and public key or more than on keys?
Thank you for this! However, I keep getting the same error: Permission denied (publickey). Any advice? thanks!
Leo, you wrote:
“It will ask you to move the mouse around to generate randomness. (Randomness is a key component of public key cryptography).
Yes: it certainly is! But IMHO, the “mouse-movement” algorithms commonly used for generating randomness are way overrated — the user typically responds with quite predictable movements: wide, sweeping motions back and forth, up and down, and/or wide circles. I know: I’ve done it, too. And I’m never really content with the resulting “randomness.”
With the advent of services like HotBits (https://www.fourmilab.ch/hotbits), pools of TRUE RANDOM entropy are quite accessible, and I would strongly encourage the use such services — if only more programs would provide an option for the user to specify a source file of trusted entropy!
Some encryption programs — VeraCrypt among others, yay! — already offer an option to further encrypt a target using an additionally specified file, called a “keyfile” — an MP3 or WAV file, for example (but neither one a good choice, in my opinion). Needless to say, I avail myself of this option, using large “random byte” keyfiles derived from HotBits (I actually mathematically “combine” two separate such files for extra security).
I am totally satisfied with the resultant security. :) :) :)
If you create your own .mp3 or .wav file, it should be quite random. Still, if it uses the ascii value of the media file, it would be extremely difficult to guess which song or clip (and more specifically which portion) you used so I’d imagine it’s pretty safe.
Leo, you wrote:
“The public key will be placed on the server by your system administrator, giving you access.”
Could you please elaborate on this? The “system administrator” is often the user himself; what “server” does one place the file on, and how does one place it there?
Remember, SSH is all about accessing a (usually Linux) server remotely, typically via the (usually Linux) command line. So, for example, it’s how I access the askleo.com server. So, yes, particularly when you’re doing web hosting on Linux servers and such, there absolutely is an administrator other than yourself. Again depending on your hosting, you may be the administrator, in which case you’ll have access to some kind of interface that will allow you to upload the public key.
Leo:
I know you have no control over what ads pop up on your site, but very consistently an ad pops up in the top left corner of your article website that partially covers your headline & the first text in the article. It always seems to have ezoic below the ad. It’s very annoying & the ad box still covers the text even after I click on the ad delete “X”. Can you control the size of the ad box so it doesn’t cover your text? BTW, this also happens with ads in the body of the article that cover text.
I forgot to add that I’m using the MS Edge browser.