Some time ago, I realized the external hard drive I carry with me when traveling was an easy thing to lose. Some of the data on that drive is encrypted in various ways, but the vast majority is completely unencrypted.
If that conveniently small, portable drive walked off in someone’s pocket, they’d have access to a lot of my stuff.
In a forehead-slapping moment, I realized I was going about this all wrong.
I should encrypt the entire drive.
Become a Patron of Ask Leo! and go ad-free!
Whole-drive encryption
When you encrypt an entire drive, it initially looks like an empty, unformatted drive containing “RAW” data. To access the contents of the drive, you must first “mount” it, providing the proper passphrase to enable its unencrypted access.
Once mounted, it operates like any other drive, until you shut down the computer or explicitly dismount the drive, at which point it again appears to be an empty drive.
If someone does walk away with the drive, they’ll have a nice, empty-looking drive they can do whatever they want with – except access the encrypted data.
Installing VeraCrypt
Download VeraCrypt from its primary site.
The setup is fairly standard, so I won’t walk through all the steps here.
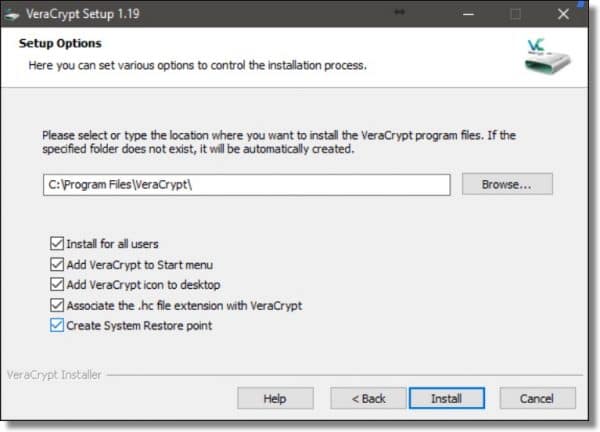
In general, you can accept the default settings, and when the installation is complete, double-click the VeraCrypt icon on your desktop to start the program.
Encrypting a drive
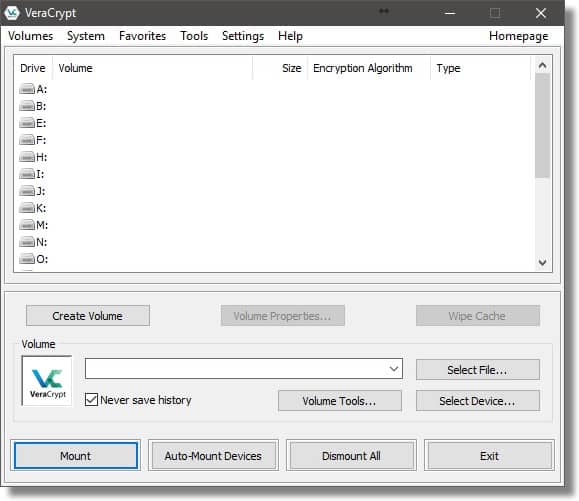
Click on the Create Volume button to begin.
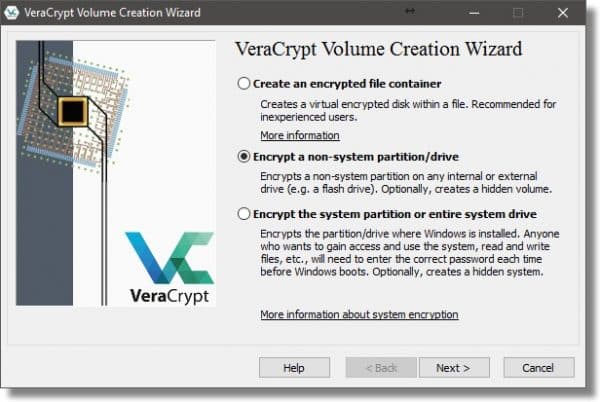
There are three types of encrypted volumes you can create using VeraCrypt:
- An encrypted file container: this is a stand-alone file that contains the volume. It appears on unencrypted drives as a large file containing random data, and must be “mounted” to make its contents accessible. It’s useful if you don’t want to encrypt an entire hard disk, or if you want to copy the file container from machine to machine.
- A non-system partition/drive: this is a separate partition or drive that will be completely encrypted. This post will present this process.
- A system partition/drive: this is the partition containing Windows itself. Since this is the partition from which the machine boots, it takes additional steps (and complexity) to encrypt the entire drive and still be able to boot from it.
Since we’re encrypting an external drive, make sure “Encrypt a non-system partition/drive” is selected, and click on Next.
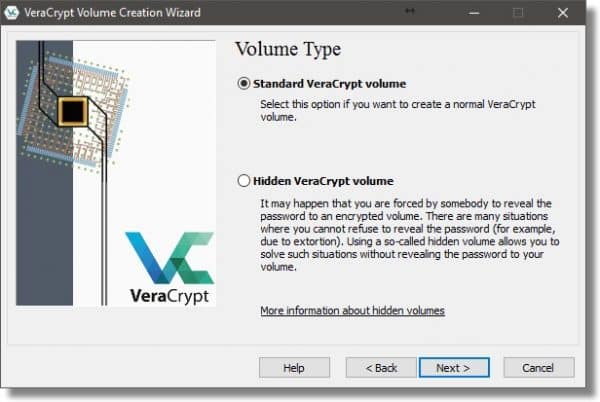
Select Standard VeraCrypt volume and click Next. (Hidden volumes are beyond the scope of what we need to do here.)
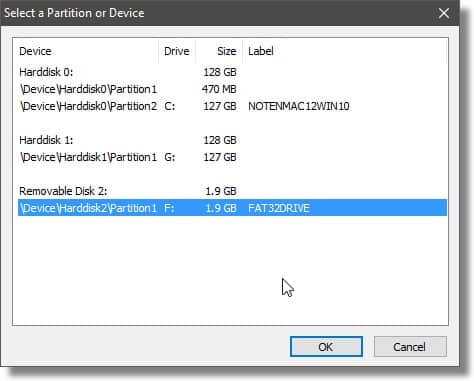
Click the Select Device… button on the following dialog (not shown).
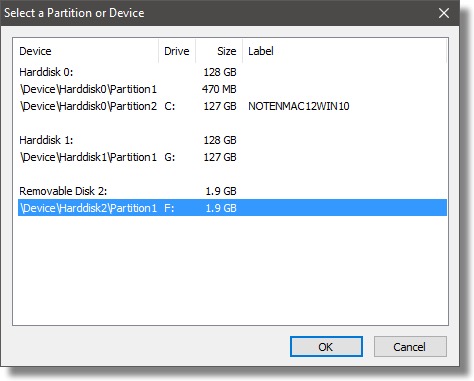
You can see that each hard disk on my machine is listed, including the external one. On hard drives that have multiple partitions, each partition is listed as well. In my case, I’ll click \Device\Harddisk2\Partition1, also labeled as F:, which is my external drive, and click OK.
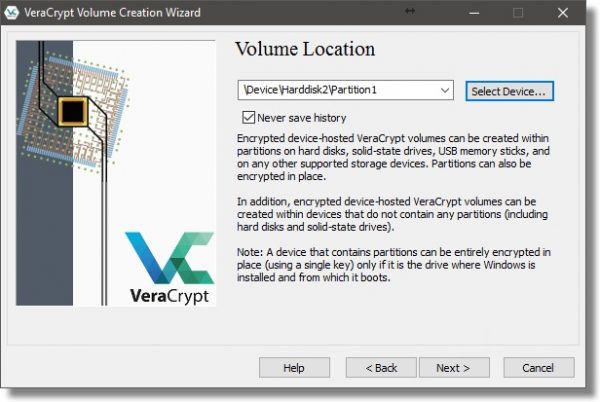
This returns us to the Volume Location dialog with the location filled in. Click Next.
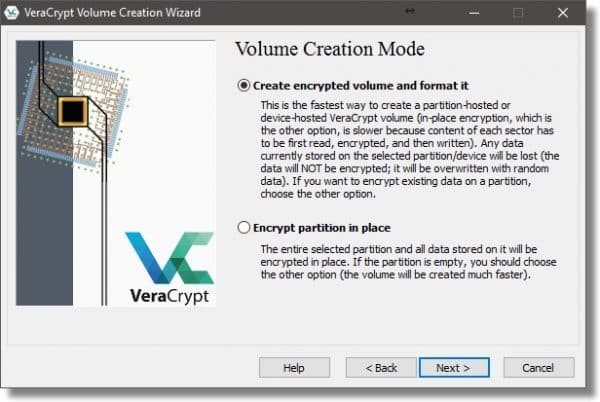
When encrypting an external drive, VeraCrypt can operate one of two ways:
- It can erase the drive, creating a new, empty encrypted volume to contain your data. This is generally fastest, but erases all data currently on the drive or partition.
- It can encrypt the data in place. This takes more time, as every sector (used or not) is read, encrypted, and written back out to the drive.
My example external drive is full of data I no longer need, so I’ll choose “Create encrypted volume and format it”. If you wish to retain your data, choose “Encrypt partition in place”.
Click Next.
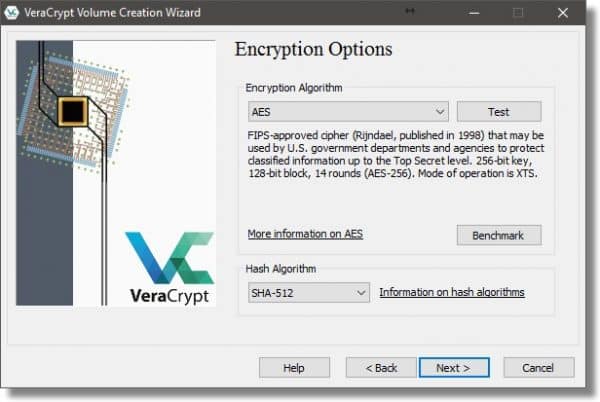
VeraCrypt actually supports a number of different encryption algorithms, and you can select among the variations here if you want. It’s typically best to accept the defaults and click Next.
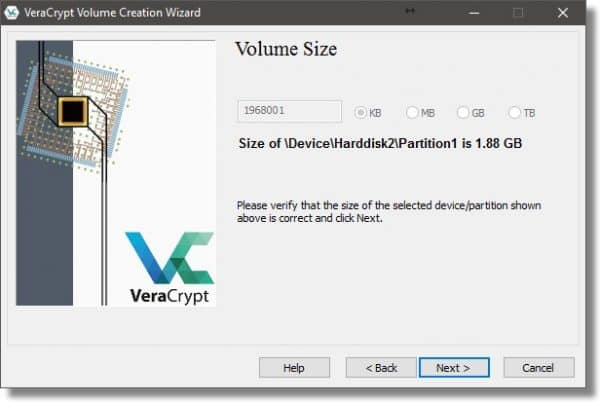
When encrypting an entire hard disk, the Volume Size dialog simply reports the size of the drive you’re operating on. Click Next.
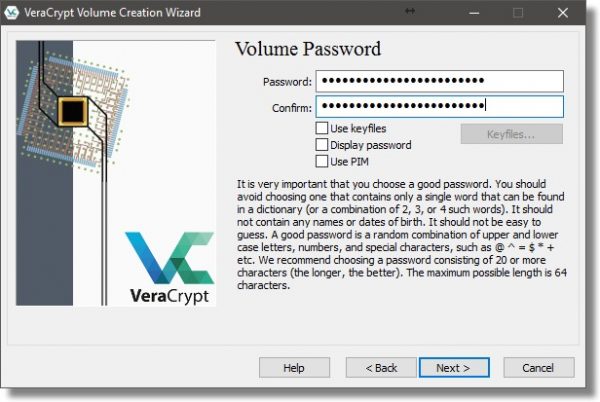
Password selection is perhaps the single most important aspect of this entire operation. A poor password is by far the weakest link in any encryption. VeraCrypt will allow you to see the password as you type it in, if you so choose (check the Display password box).
In this case, I’ve typed in an example pass phrase – a longer multi-word phrase that is both memorable and relatively long.
Do not forget your password. A VeraCrypt volume cannot be accessed without the password. There are no back doors or recovery methods. If you lose your password to a VeraCrypt volume, you have lost the contents of that volume.
Click Next.
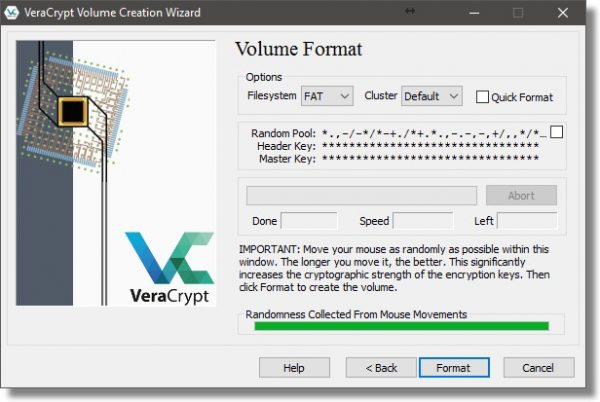
Random data is an important aspect of encryption. Don’t take this the wrong way, but you are the most random thing connected to your computer.  As you respond to the entries in this next dialog, VeraCrypt will use your random mouse movements to generate random data. Make sure the “Randomness” bar has turned green before moving on.
VeraCrypt makes a guess or two on your Filesystem choice. I tend to prefer NTFS as being slightly faster in many cases, and supporting more robust security. FAT, on the other hand, works just about everywhere.
If Quick Format is checked, the formatting process is performed quickly, writing only filesystem and directory information to the disk. The downside is that the contents of any sectors not written to could, potentially, still be recovered.
If Quick Format is not checked, then the formatting process will write to every sector on the disk, obliterating any pre-existing data. It’ll also take longer.
Click on Format.
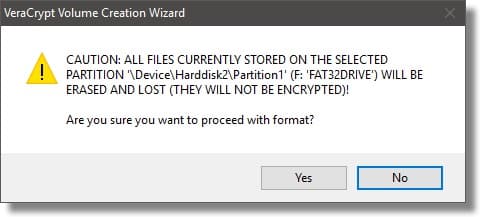
Depending on how much pre-existing data your target drive appears to have, you may get one or two warnings it’s about to be erased. Click Yes, and formatting will proceed.
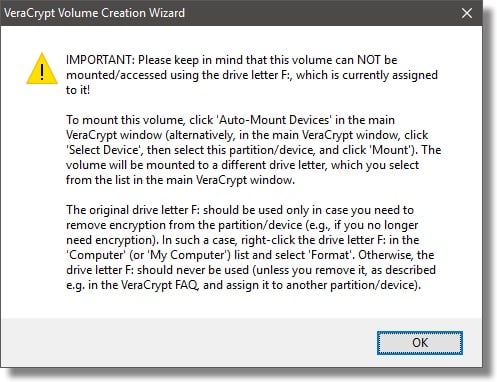
VeraCrypt will take a long time to encrypt a volume of any significant size. It doesn’t matter how much data is on the volume; all sectors, whether they’re used or not, are encrypted. When complete, VeraCrypt provides some additional instructions on how to mount your encrypted drive.
Using your encrypted drive
When you connect your VeraCrypt encrypted drive, you may get this message:
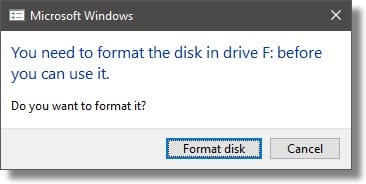
THE ANSWER IS CANCEL.
Your drive is encrypted and has not been mounted. To Windows, your encrypted data looks like an unformatted (RAW) drive. If you were to format it, you would lose everything on the drive.
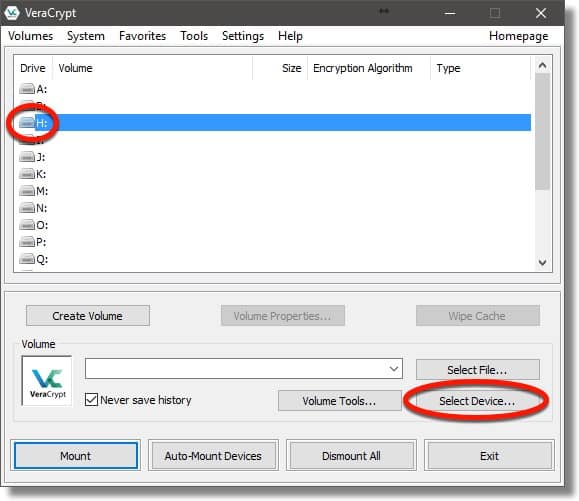
Click Cancel. Open VeraCrypt and click the drive letter you want your encrypted volume to appear as, and then click Select Device….
Click the drive letter or line that represents the encrypted drive, and click OK.
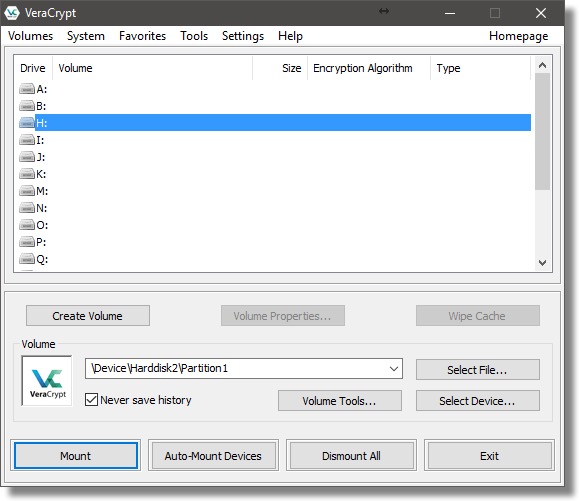
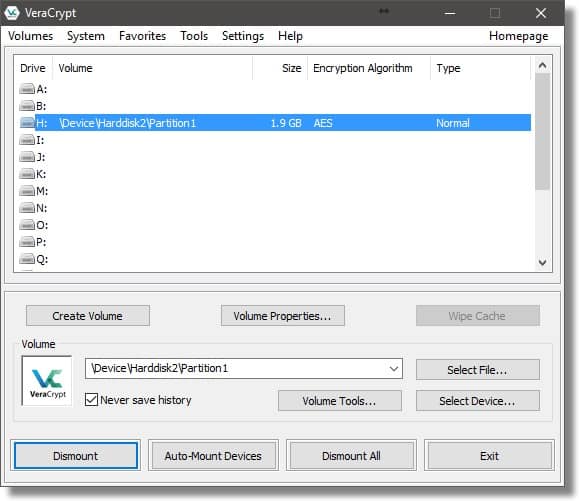
You can see the volume is filled in (in my case, it’s \Device\Harddisk2\Partition1). Click Mount to mount the drive.
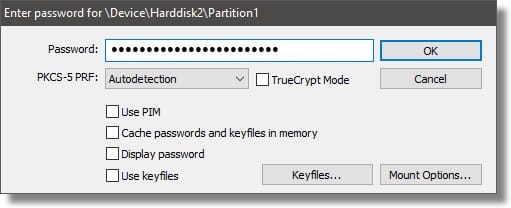
Enter the passphrase you used when you encrypted the drive, and click OK.
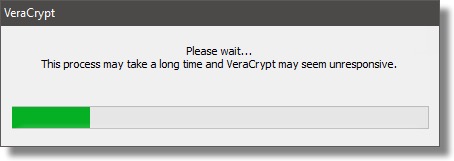
VeraCrypt takes a little time to mount the drive.
As you can see, the contents of the encrypted volume are now available as drive H:. Drive F:, the drive letter at which the external drive originally appeared, remains in use, and still looks like an unformatted disk. VeraCrypt makes its encrypted contents available as the drive you select when mounted (in this example, the H: drive).
Dismounting
Naturally, when you power down your machine, the encrypted volume will be dismounted. When you next power up your machine, or attach your external drive, you’ll need to mount the drive again in order to access its contents, providing the passphrase, of course.
That is kinda the point.
If you want to remove the external drive without turning off your computer:
- Close all programs currently accessing files on the encrypted volume (“H:” in my example below).
- In VeraCrypt, click the mounted volume and then click Dismount.
- Finally, click the “Safely Remove Hardware” icon in the Windows Taskbar and click the device listed there. (“F:” in my example below.)

Yes, it’s a bit of work to set up, but once it’s done, it’s relatively easy to use, with little to no impact on performance . More importantly, it’s secure. I can now lose my external hard drive without fear of anyone gaining access to its encrypted contents.
Do this
Subscribe to Confident Computing! Less frustration and more confidence, solutions, answers, and tips in your inbox every week.
I'll see you there!
Podcast audio

More for Patrons of Ask Leo!
Silver-level patrons have access to this related video from The Ask Leo! Video Library.

Is there a chance of losing data during the encryption process? Should the drive be cloned first as a safety precaution?
Data can be lost during any process, including daily use, so regular backups of the drive are always essential. Cloning is not necessary as you are usually only interested in the files, not the free space. If your data is sensitive, I’d suggest backing it up to an encrypted volume or partition, or encrypt it as soon as you’ve completed the encryption process. And always have a backup of all of your data.
There is a chance of losing data through ANY process. So yes, always do a backup image before. Just remember, however, if you are doing this for security purposes you’ll need to make sure that any backup copies are also secure.
Of course. BACK UP FIRST. Always. Regularly. But you’re backing up regularly already, yes?
Sure, and you can lose your data if you forget your password (as Leo said, “Do not forget your password. A VeraCrypt volume cannot be accessed without the password.”) In fact, forgotten passwords are probably the most common cause of encryption-related data loss.
When it comes to encryption, it makes sense to think about whether the data really needs to be encrypted. If you pack around a laptop , it should probably encrypted; if you have a desktop, it probably doesn’t need to be encrypted.
In your April 12, 2017 article: How Do I Encrypt a Hard Drive Using VeraCrypt #27408
You stated:
“It can encrypt the data in place. This takes more time, as every sector (used or not) is read, encrypted, and written back out to the drive.”
Would this be appropriate for a SSD?
Thanks,
Jim
Addendum:
I intended to ask: “Would this be appropriate for a rather large (1TB) internal or external Solid State Hard Drive.”
It shouldn’t be a problem with a large SSD as it’s not having to write several times to the same cell as a multi-pass wipe would.
Sure, as it writes the data only once.
Leo –
Thanks for this article. Now I’m (almost) ready to make the jump from using TrueCrypt to VeraCrypt. I have a question on how to remove the TrueCrypt encryption from an external drive, so I can replace it with VeraCrypt. This was a whole-drive encryption on a non-system partition/drive, and the volume type created was a Standard TrueCrypt volume.
According to the TrueCrypt user’s guide (under the Help tab), I have no choice but to first move all of my encrypted files to some other hard drive. (I hate this because when I’m done, I will have to securely wipe clean this other hard drive, which will take a very long time.) The user’s guide on page 105 then provides 3 procedures for removal of the encryption software depending on whether the TrueCrypt volume is (1) file hosted, (2) partition hosted, or (3) device hosted. Can you clarify what these 3 categories mean? I’m not sure which one I should follow.
Thanks…
There is no way to remove the encryption other than to copy the files to another location. If they did allow a decrypt in place option, it would involve the programs moving the files to another temporary location and deleting or shredding the unencrypted files.
To be honest I’m not certain myself. What I can say, and in fact recommend, and would do myself, is to copy off all your files, change the hard drive encryption to VeraCrypt’s, copy the files back, and then secure wipe the other drive. (A single pass should do it, so I wouldn’t invest in extra passes.)
Just to be sure: After I copy the files to another device, I still need to remove TrueCrypt from the drive before I install VeraCrypt on that same drive — correct? If so, I can just reformat that drive, or maybe even securely wipe that drive — correct? Thanks…
Actually re-creating an encrypted drive using VeraCrypt would likely overwrite the TrueCrypt from before, so I would not expect it to be needed.
There is no need to securely wipe a second drive if you simply transfer the data to an encrypted file then copy that file to the original location. All data will then always be encrypted and never left in the open. If you transfer to a new encrypted external drive then after verifying data integrity just reformat the original drive with VeraCrypt.
Elsewhere on your site Leo you express confidence in Truecrypt. Here you give comment assisting in changing to Veracrypt. Is it now your recommendation to change to Veracrypt? I notice by the way that the Veracrypt screens are very similar to Truecrypt.
VeraCrypt is the successor to the now abandoned TrueCrypt. Leo has covered this in related articles.
Truecrypt is no longer supported and has become vulnerable to malware. Veracrypt took over the Truecrypt project and is Leo’s recommended replacement.
https://askleo.com/is-truecrypt-dead/
I don’t know that it’s actually vulnerable to malware, but yes, it’s time to begin moving on.
TrueCrypt is dead. I definitely recommend something like VeraCrypt for new installs. (VeraCrypt was built from a fork of the TrueCrypt source code.) While I wouldn’t say it’s critical to change, I would begin the process of switching my TrueCrypt usage to VeraCrypt.
Hi,
I have encryption with VeraCrypt. I am curious how do you remove the encryption option all together and just revert back to having a normal non-encrypted portable hard drive without the need for VeraCrypting anymore?
I have a portable hard drive that has outlived its usefulness and would like to remove encryption and recycle like a normal drive.
Thanks in advance.
I’m not sure of the official way to do it, but if you only want to turn it into an unencrypted drive, the easiest way would be to copy off the files you want to keep and format the drive. It will then be a clean formatted drive.
That’s pretty much the official way. :-)
If I encrypt my external hard drive and take it to another computer, does that computer need to have VeraCrypt installed in order for me to use (mount) my drive?
Yes.
Hi Leo
Very interesting article … can I push for some more intensive information?
I have used Veracrypt containers/volumes for about a year, and am beginning to feel comfortably with them.
How different is it to veracrypt a whole (external)drive? are there any extra risks of data loss? currently I can copy the whole veracrypt container file like any other file, what are the implications of having a whole drive encrypted?
I use my encrypted containers to keep backups ie I never intend them to be edited. My ‘Master’ files are all on an un-encrypted system-drive. Is is a good idea to apply veracrypt to the system drive? does it make the system less robust?
My question is in regards to encrypting a 30gb volume on my hard disk.
I’m unsure which portion or partition to do this on. I don’t want to mess up my OS.
The only portions of my hard drive that are big enough are the one that holds Windows and the one that says Lenovo( i guess has my Lenovo back up files..)
I don’t really want to encrypt my wholehard drive.just a 30gb portion of it. My laptop has a TB of hard-drive space.
I realize this is an old, yet still useful information, but when a new external 2TB drive is checked for Quick Format, it was instant (was dreading the 30+hours of encrypting)! Now it says that
“If Quick Format is checked, the formatting process is performed quickly, writing only filesystem and directory information to the disk. The downside is that the contents of any sectors not written to could, potentially, still be recovered.”
What exactly does it mean? Does it mean just immediately, but as new data is written on sectors, it will be encrypted? Thank you.
As a side note, with ultra fast primary drive SSDs, encrypting should almost be mandatory – recovering from crashed SSD is not as feasible as traditional HDD anyway, but you get the added data privacy, right? It’s only during the initial encrypting and booting up that’s extra work – the very least create containers…
Quick format rewrites only the file system info and leave the rest of the drive untouched. A program like Recuva reads the sectors of the drive and can recover what isn’t overwritten. As new data is added it will begin to overwrite what’s on the drive.
That is correct, any old unencrypted data is left alone. Only when new data is written is that new data encrypted.
Awesome, that was fast guys! Thanks again.
Is there any way to remove the option for “format disk” that Windows displays when you insert the drive into the computer for the first time? Is there any way to make the drive so that you cannot delete its contents while keeping its content behind an encryption?
Not that I’m aware of, no.
It’s May 2021 and this article is still extremely helpful – without it I would have struggled to figure out exactly what I needed to do to encrypt a Seagate remote drive with VeraCrypt – thank you!
I prefer using containers over entire drives simply because of the “do you want to format” issue when connecting to or trying to open the drive.