Windows might need a little push.

I’m certain there’s a limit, but I have no idea what it is. I’m also certain it’s not the problem here.
You attach a drive, either internal or external — perhaps even get the “new drive attached” sound — and then… nothing. Nothing corresponding to the drive appears in Windows File Explorer.
There are a variety of reasons this can happen. I’ll show you how to deal with the most common scenario.
Become a Patron of Ask Leo! and go ad-free!

External hard drive not showing in Windows
A disk can sometimes be connected and not have a drive letter assigned to it. When this happens, it will not show in Windows File Explorer, even though it’s working otherwise. Use Windows Disk Management to assign a drive letter manually by right-clicking on the drive, selecting “Change Drive Letter and Paths…”, and clicking on “Add…”.
Disk Management
We’ll start with your problematic disk disconnected. Physically unplug it from your computer. (If this is an internal disk, it’ll have to stay connected. We’ll deal with that below.)
Right-click on the Start button and click on Disk Management.
The Disk Management utility, shown above, lists all connected disks, memory card readers (which may or may not have cards inserted), and optical drives (which may or may not have discs inserted). The top pane lists all partitions, and the lower pane lists all physical disks with the partitions they contain displayed in boxes alongside.
Now plug in the disk you want to access.
If a new entry appears in Disk Management’s lower pane, that’s good news. That implies the hardware is working and the drive is being recognized by Windows.
Internal and already-connected drives
For internal disks (or disks that for whatever reason can’t be unplugged and plugged in again), we have to hunt a little.
In Disk Management, see if there is a disk listed that matches what you know about the disk you’re trying to access. That could be the name of a partition on it, or, more commonly, the size of the disk as compared to the other disks on your system. For example, if you know you have a 1TB disk that’s working and a 16GB disk that’s not, if you find a 16GB disk listed, you can be fairly certain that this is the disk you want.
If the disk does not appear at all when you plug it in or you cannot find it listed based on its characteristics, then you’re likely looking at a hardware problem. Check the cables and connections. If this is an external disk, see if it’ll work plugged into a different port, with a different cable, or on a different computer.
The more common case, though, is that the disk appears in Disk Management but still doesn’t appear in Windows File Explorer.
Disks that appear and yet don’t
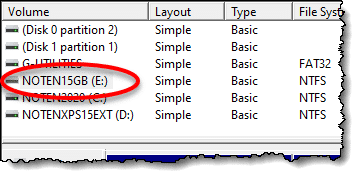
Let’s widen the first column of information in the upper pane listing the drives in my example and look closely. Notice something interesting?

While my primary disk’s single partition is listed with drive letter “C:”, and one of my external disk’s partitions is listed with drive letter “D:”, there are a couple of drives there that have no letter at all.
“G-UTILITIES” is a partition on my (working) external drive.

This is extremely common, and not related to our problem at all. Many disks come with multiple partitions; some contain utility or recovery tools. In this case, the clue is that my external hard disk is a G-Drive branded disk, and the “G-UTILITIES” partition is likely to be utilities that came with the drive. It’s a small partition, and I didn’t bother to take the time to remove it.1
The more problematic disk is the one named “NOTEN15GB”.
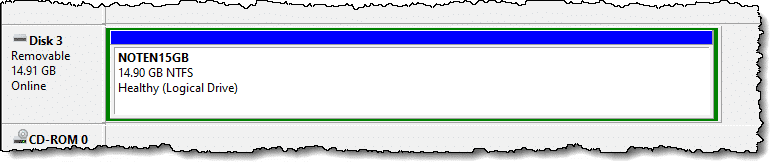
The name comes from the label of the single partition on the disk that is 15GB in size. That’s my 16GB thumbdrive (and yes, drives labelled 16GB may show as 15GB because of the way disk space numbers can be (mis)used. I talk about why that is here.)
The thumbdrive has no drive letter, and as a result does not appear in Windows File Explorer.
While I don’t have a specific reason why2, I believe this to be the common cause for a large number of “functioning properly” but still inaccessible disks. It’s been successfully attached to the system, but for one reason or another, a letter hasn’t been assigned.
It’s an easy fix.
Assign a drive letter manually
Right-click on the drive in question in either the top or lower pane (lower pane shown).
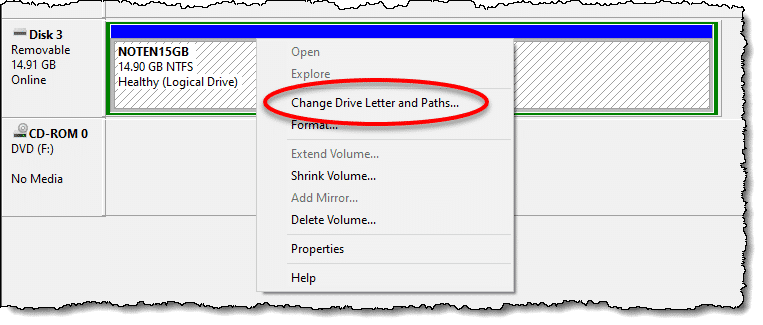
Click on Change Drive Letter and Paths…
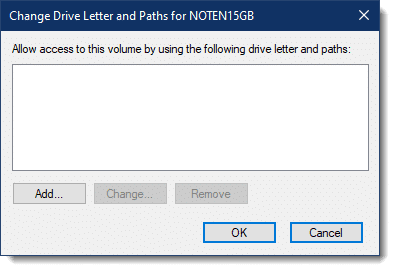
As you can see, the drive can’t be accessed because the list of ways to access it is empty.
Click on Add….
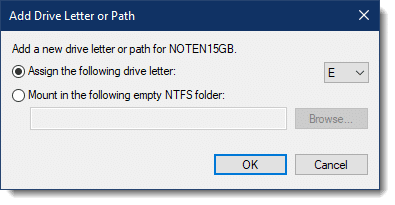
Ignore the “Mount” option; we’re just going to assign a drive letter. As you can see, Windows defaults to the first available drive letter, which on my system is “E:”. There’s a dropdown list, though, and if you’d like the drive letter to be something else, you can select a different letter.
Click OK.
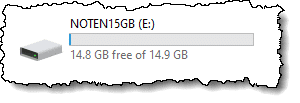
Disk Management updates its display to reflect the letter assigned to the disk… and in Windows Explorer, we can now see the drive.
While this doesn’t cover every case of a connected drive not appearing, in my experience this is a common enough occurrence that it may well cover your situation.
Do this
By far the most common situation when this happens is a working drive without a drive letter assigned. Go straight to the Disk Management tool and assign one. It’s that simple.
If it doesn’t appear in Disk Management, then you’re likely facing a hardware issue that needs to be resolved before you can proceed.
While you’re here, subscribe to Confident Computing! Less frustration and more confidence, solutions, answers, and tips in your inbox every week.
Podcast audio

Related Video


In Computer Management, my external HD shows a red downward arrow when plugged in and it has thee designation “Disk 1 Unknown Not Initialized”. When I right-click it, I get these 3 options: “Initialize Disk – Offline – Properties”. The second option results into “The request failed due to a fatal hardware error”. Does this mean I can never recover its content? If I open Properties, under the Event tab I see – among other entries – one labelled “Device not migrated” which gives me pause.
Any tips?
Hopefully you have that data backed up somewhere. There is, indeed, a possibility that there’s a fatal hardware problem.
I would first try the drive in another computer. Also try a different USB port and cable. DO NOT INITIALIZE the disk — that will most certainly erase whatever is on it.
So, “initialize” and “format” are synonyms?
(I’m very glad that wasn’t the case for my old Commodore-128 computer and 1571 disk drive! On the C128/2571, “initialize” and “format” are two very distinct commands; to make them synonymous would have resulted in utter disaster.)
Not really. To be honest I’m not 100% convinced I “get” just what initialize is. I believe it’s setting up data structures for partition management (MBR or GPT), and the format is what you do to individual partitions.
Whenever I’ve had an ssd connected via usb and it didn’t show on W7 Explorer, I discovered that the sdd was listed in Device Manager as being “offline”. The ssd was supposedly “in collision” with another drive, whatever that means. I don’t recall how to bring a drive back on line, but doing so revealed the drive to W7 Explorer. Perhaps Leo will refresh my memory.
Assigning it a drive letter in Disk Management should bring it “online”.
This is a problem I solved many years ago on XP, so it may not happen with newer versions of Windows.
A student brought me a USB HDD. His computer didn’t assign it a drive letter. I ran Disk Management, and that didn’t show the attached drive. I downloaded the trial version of EaseUS Partition Master, and that was able to recognize the drive and assign letter.
The trial version of EaseUS Partition Master is great for most casual users. If you need to repartition a drive on the fly, it’s usually something you’ll probably use only once on your computer, so you you may not need to buy it.
Mark,
For partition management, I use System Rescue (https://www.system-rescue.org/), a live USB/CD/DVD image that includes gParted, an Open Source GNU/Linux-based partition management app. The System Rescue live image doesn’t support Secure Boot so to use it, that feature must be disabled on the host computer before booting up. When the live image finishes loading, you find yourself at a command line. To get to a graphical User Interface (GUI), enter ‘startx’ (no quotes). This command will start the X-Windows system (GUI support) and the graphical desktop environment (What you see and interact with).
Ernie (Oldster)
There’s a handy inexpensive utility for Windows called Zentimo xStorage Manager Pro that let’s you better control the assignment of drive letters to removable drives (USB, hard, SSD, etc.). In fact you can use this small utility to assign the same drive letter to, say, an USB drive no matter what computer you plug it into. It also enables you to stop an attached drive so you can safely remove it. If drive letters for removeable drives have been an issue for you, this $29 utility is well worth it (and I got it on sale for just $19 recently). They offer a 30-day free trial at https://zentimo.com/ and I freely admit just a week of using it convinced me to buy it. One license entitles you to install it on all of your computers.