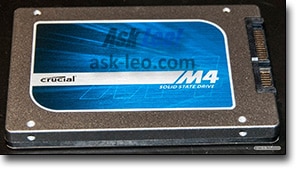
Before I upgraded my primary desktop machine to Windows 8, I decided to replace its hard disk with a solid state drive.
There was no other reason than “wouldn’t it be cool” to really drive my decision. The expectation was that certain operations on the upgraded machine would be faster.
As it turned out, my machine had plans of its own, and the timing of my upgrade honestly couldn’t have been better.
Here’s what I did.
Become a Patron of Ask Leo! and go ad-free!
My failing drive
My process was to be actually pretty simple. As you might expect, it starts with an image backup of the drive to be replaced. I’d been taking nightly backups (or so I thought), so technically, a last-minute backup would be redundant, but it’s also a great safety measure. It’s also slightly more convenient to have an actual, single full-image backup rather than an image backup and some number of incremental backups.
The problem was that the image backup that I attempted to take failed. (At the 99% mark, of course.  ).
).
In fact, the hard disk had developed a bad sector on the day that I ordered the replacement drive. As a result, my nightly backup program had been failing since that day as well. On top of that, it failed to notify me because of a change that I’d made to my email configuration; I hadn’t updated the program yet. It tried to tell me that things were failing, but I never got the message.
So when it came time to perform the upgrade, I had a disk with a bad sector and my latest backup was roughly three days out of date.
Rather than sucking it up and reverting to that three-day-old backup, I elected to run both SpinRite and CHKDSK /R on the drive over the next two days.
Then, finally, I could grab an up-to-date backup of the machine’s existing drive.
The moral of the story so far: check up on your automated backup from time to time to make sure that it’s actually working as expected. (And, apparently, don’t let the drive know its replacement is on order – it would seem this knowledge makes drives cranky. )
The replacement process
Centered around backup disk imaging software, the process that I used was actually very simple:
- Create the rescue media used by your backup and restore software.
- Create a full backup image of the disk being replaced. While that took me two or three days because of the problems that I described above, this should only take you a couple of hours.
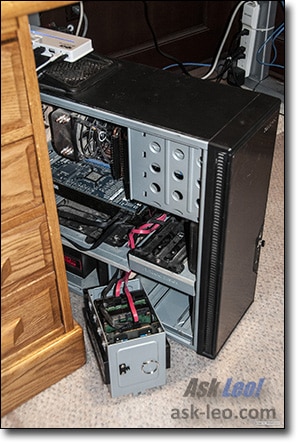
- Replace the drive physically. As you can see from the photo above, that involved extracting the bay on my machine which holds the drives and then disconnecting, unscrewing, replacing, re-screwing, and reconnecting the components involved. The specifics will vary dramatically depending on the machine that you have. Two things are constant: unplug the machine from power before you begin and make sure to discharge any static by touching the chassis often and before inserting new components. If you’re in a particularly static-prone area, you may even go so far as to get a grounding wrist-strap to connect you to the chassis throughout the entire operation.
- Boot the machine from the rescue media that you created earlier.
- Restore the backup image you took from the old drive to the new drive.
- Remove the rescue media and reboot your machine. Watch it reconfigure itself a little to the new drive.
You’re (hopefully) done.
I actually had an additional step that I’ll cover in a separate article: when my machine rebooted, it reconfigured for the hardware just fine, but the amount of change apparently triggered Windows Activation. I had to take additional steps to re-activate my copy of Windows online.
If the new drive is smaller
One of the issues that I glossed over was that my old drive was one terabyte, while the replacement SSD was only half that size at around 500 gigabytes. In other words, the new drive was smaller than the drive it was replacing.
As long as you plan ahead, and as long as you’re using good backup and restore software, this typically doesn’t present an issue.
My approach was:
- Reduce the amount of data on the old 1TB drive to something less than 500GB. There’s obviously no way to move more than 500GB of data to a 500GB drive, so that issue I had to manage myself by moving data around on my machine. I believe I actually got it down to around 250GB.
- Use backup and restore software that can handle the partition size changes when performing the restore.
That last item concerned me. I’d been down this road before a couple of years ago and the backup software that I was using at the time came up short. It simply refused to restore the image of a partition that was larger than the new drive, even though there was ample room for the data.
Macrium Reflect, on the other hand, just worked. During the restore, it didn’t even ask, it simply noted that the 1TB image was being restored onto a 500GB drive, and as there was room for all the data, it would simply resize the partition appropriately.
If the new drive Is larger
When replacing a traditional hard disk with a solid state drive, “downsizing” is common; when replacing a hard drive with a hard drive, it’s not at all uncommon to take advantage of that time to increase the drive’s capacity.
Depending on the capabilities of the backup and restore software being used, there are several approaches to dealing with the extra capacity.
- It. Just. Works. This is the case when the backup software notices that its restoring a smaller partition to a drive with larger capacity and automatically increases the partition size to encompass the entire disk. I’m not sure how common this is, and I would expect that the software would ask first. The restored partition remains the same size as the original drive, and the
new drive is left with some amount of unpartitioned space when you are done. In this case, you have two options: - Create an additional partition that encompasses the additional space. For example, you might create a D: drive that you would use to access the greater capacity.
- Extend the partition that was just restored to encompass the entire drive. In this case, the C: drive would just get bigger.
I tend to prefer the later option.
The good news is that either option can be performed with Windows 7’s built-in disk management tool.
Footnote: My splurge
As I noted, I replaced my 1TB C: drive with a 500GB SSD. It works, and indeed my machine boots faster and programs load more quickly.
But I have less space.
I couldn’t let that stand.
So I also purchased a 3TB drive to add to my system. That should last me for a while.
If you look closely at the image of my machine, you’ll see that the drive bay actually holds three drives:
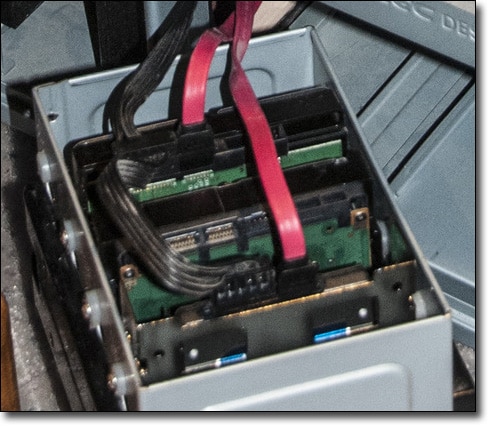
(That photo was taken while the work was in progress, as only two of the drives have cables connected.)
I now have three drives on my system:
- C: – 500GB Solid State Drive; the system drive with Windows installed.
- D: – 1TB hard disk. It sat by patiently throughout this whole process and was not changed.
- B: – 3TB hard disk. Yes, I assigned it the drive letter B: so as not a need to alter any of my other assignments. B: is historically held aside for the second floppy disk on a machine, which is simply not going to happen here.
So, I think I have enough space.
For now.

“Create the rescue media used by your backup and restore software.” Is that where you used Macrium Reflect?
Where did you write the image to?
Any need to defrag first?
Thanks.
16-Apr-2013
1. Wouldn’t unplugging the machine make touching the chassis to destatic yourself ineffective? You need to touch something else that has current. Also, hooking a wrist strap to the unplugged chassis would seem to be ineffective as well.
2. Instead of backing up drive image, can one just reinstall everything on the new drive, should one be so inclined?
This is a topic I’ve needed for some time. Thanks.
16-Apr-2013
“For now!” I know that sentiment well!
I’m planning to replace my 1TB backup drive, which is an external. Your article could have been better timed. Are solid state drives (SSDs) a good choice for Macs as well?
16-Apr-2013
I did this on black Friday;
dd it to one machine (120 gig c: drive), and was so impressed I got two more for two diferent machines (one 240-g, and one other 120-g)
the BOOT-up time is unbelievabl !
use smaller c: drive for prorams, and do as leo did, larger 1 to 3 tb drive for d:drive data
machine boot time cut to about 1 1/2-to-2 minutes to load everything, from 5 minute boot-up (I had delayed startup routine, to load stuff slowly, and I have about 20 programs that start at startup, and it is fantastic)
Are we at the point that SSD drives don’t have the write limitations of years past?
16-Apr-2013
“And, apparently, don’t let the drive know its replacement is on order – it would seem this knowledge makes drives cranky.”
I had a ’65 Beetle many years ago. When I bought the car, the owner gave me a book, “How to Keep Your Volkswagen Alive: A Manual of Step-by-Step Procedures for the Compleat Idiot.” One of the author’s statements is that, if your VW has a problem on the road, fix it the best you can, but promise your baby that you’ll fix it right when you get home. Keep that promise, however, because she’ll remember. I guess hard drives have feelings, too.
Follow the instructions in the article. Pulling the plug is safe, not pulling the plug may not be. Earth ground is not important at all. What matters is the PD (potential difference) of the component to the case ground. If you don’t know this, don’t tell anyone how to do it until you learn yourself.
A while ago I had written a tutorial for the purpose that may be useful in the context.
http://www.sevenforums.com/tutorials/149969-ssd-install-transfer-operating-system.html
@Steven,
Yes, solid state drives now have the necessary longevity. Leo wrote a great article on that:
Do SSD drives have a limited life expectancy because they are flash memory?
If you’re going to have just one drive in your computer, are there advantages (besides cost) to going with a hybrid drive as opposed to going all solid state?
I use 2 image programs, Macrium Reflect, and Easeus Todo. I alternate creating images between the two.
The free version of MR does not have an “image check” feature, and that is important to me, so I use the paid version on my main system. During the years that I used True Image, there were times that a “bad” image was created.
The free version of Easeus Todo has the image check feature on both the free and paid versions.
I generally like MR better than Todo. On my main machine, I have both programs #paid versions# installed. On my other machines, I have either 2 free versions, or 1 MR free, and Todo paid versions.
Switching to an SSD drive is a good idea these days. I started using a 128 SSD back in 2010 when I built my first machine with SSD. Back then the prices were 3-4 times today prices.
I have several things I do, when I have a small 128 GB SSD, and lots of HD space in other conventional drives.
1. I don’t keep any of my Data, Photos, et al on the SSD. I put all of that on the regular hard drives. And since I back up this material using scripts via a program called “FolderSync” that material gets backed up in many places. On my C #system# drive, I image regularly – on my main machine weekly, and on my backup machines monthly.
2. I store all my images both on other system hard drives, and also external USB3/eSata hard drives
3. When I install a “huge program”, such as my Hallmark card program, I install it on one of the hard drives. It’s about 8 GB, with all the graphics et al. And so it may run a little slower on the HD, but that’s no problem. All other programs I put onto the SSD. I find that I Still have plenty of space left on the SSD, even after installing the Corel WP suite, the MS Office Suite, Adobe Photoshop CS5, and up to 50 other various programs and utilities.
4. I recently bought a Samsung 120 GB SSD, as a spare, and got a small USB 3.0 case for it. I’ve been considering using it as a storage place for some of my main system images. I may even consider restoring a system image onto it if I have a system that seems like the SSD is failing. then I could just swap out the bad SSD with this “backup SSD”.
The bottom line is that SSD system drives do run much faster than a regular hard drive. Here are several tips that I would suggest to people want to get an SSD.
A. Don’t buy a refurbished SSD. My first SSD was an OCZ Vertex 1 #their latest at the time#. It starting failing in less than a year, and failed totally shortly after that. OCZ replaced it with a refurbished Vertex 1. That failed immediately. They could not find any Vertex 2 units, so they finally sent me a Vertex 3. That seems to be holding up fine. I also am concerned when a vendor offers a lot of “refurbished” SSD’s from a given manufacturer. That tells me that their units have been failing a lot out there.
B. I would say that Samsung with their latest 840 Pro series is the best unit I would consider, and prices are now down to under $1 per GB. Samsung gets high marks all around, and good user reports.
C. Definitely use an imaging program – Macrium Reflect or Easeus Todo. I did use True Image for many years. But their terrible support and often “weird” interfaces finally turned me off on them.
Ron Hirsch
Am I the only one that cringed a little upon seeing b: used for a hard drive? I still think of that as one of my dual floppies (the 5.25″ one!), after all these years. :)
Fontmaven asked if solid state drives (SSDs) are a good choice for Macs. Yes they are. I just replaced the stock drive in my MacBook Pro with a Samsung 840 Pro Series SSD. The Mac is much faster and whisper quiet. Just use the Disk Utility to format the SSD externally, then use Carbon Copy Cloner to clone the internal drive to the SSD. Put the SSD in the Mac and reboot. Done.
At around $1 a GB the price is still prohibitive to me. Fortunately for now I have never exceeded 60 GB in files and almost half of that is media files I saved or ripped from my CD collection plus a quarter is typically redundant as I have multiples that get crunched down over time so that in reality my main set it about 20 GB including software.
I have never really gone gung-ho with internet TV, etc and stick to basics and it took 16 years to get this much archived.
@Emily: YES, I still use B: with a USB floppy although I have enough new and good used floppies and still have the hardware to mount a second drive in larger cabinets. I have several 3.5″ drives saved up and I nurse along three Sony Mavica FD models that still find much nicer than some USB-based cameras (early VGA cameras I could afford in the early days were HORRID to me and being extremely fond of cassette and reel tape I hoard floppies as well).
What about going the OTHER way? I have a fast Dell tower with XP that HAD an SsD in it. Previous owner kept the SSD. I tried installing XP on an SATA drive, but XP says there’s no drive there. I got the BIOS to recognize it, so I’m guessing I need a driver for SATA since that didn’t exist when XP debuted. Where is there a free generic SATA driver I can feed XP during install?
What’s that? A matrox card? That whole machine’s a boat anchor!
One other thing to think about – what if you want to take advantage of the newer UEFI system, Unified Extensible Firmware Interface? Another article! LOL
Also consider the new motherboards with SATA-3 and a new data cable for your new drive?
I have Windows 7 Ultimate and Iomega External Drive for back up . I have partitioned it and left 500 GB for Image back up.I also want to try it. My problem is when I back up the Complete Date (Image). it backs up but pop up comes that some files have been left out. It does not show which file are left out. Any Help
Leo,
Did you alter the location of My Docs etc from C: to another drive ?, and if so, what is the best way?
I have my 100GB SSD as C: with Win and any other programs that I cannot control the installation drive. All other data and programs are on my 1TB drive. The problem is that Windows Office suite auto loads onto C: and expects My Doc etc there as well.
How have you organised you programs etc?
19-Apr-2013
Just a comment. I suspect B: was allocated originally to 5 1/4 floppy drives?
Re: John Bennett, April 16, 2013 10:16 PM
Yes, I have a dual-drive where A was for 3.5″ discs and B was for 5.25″ discs. I used it to copy my old soft-floppies to the “new” hard-cased ones. Haven’t used it much lately, though.
Also, my first 285 had two 5.25″ floppies (A & B) for the then current single-sided floppies. It came in handy for huge programs that took up two floppies.
I’ve still got a few cables with connections for A & B drives, but the newer computers don’t have room for two floppy drives.
Leo,
Just curious, what would happen if you called an HD/SSD “A”?
@John
A: and B: were first allocated to 5.25″ floppies and later to 3.5″ which replaced them. Some computers had one of each and others had 2 of the same. There really wasn’t any standard configuration other than if you had one of each A: would usually be the 3.5″ as it had twice the capacity. In the early days many computers had 2 floppy drives and no hard drive. When hard drives were installed they were assigned the C: drive designation.
@Old Man
Theoretically it’s possible to call the SSD A: and boot from it. But it’s probably not worth the effort to do that, and you may run into problems with some programs which are hardwired to expect the OS to reside on C:.
Is C: sacred?
Do you normally have the computer you are replacing the Hard Disk in, on a carpeted floor? I hope not. It will be sucking in dust etc from your carpet It is amazing how much dust will accumulate in it, especially on fan blades and heatsinks reducing the abitity of your computer to keep itself cool. Get it up off the carpet, and floor Leo!
19-Apr-2013
Mark J,
Thank you. I wasn’t thinking of changing my OS from C to either A or B.
After reading about Leo making another drive B, I was just wondering if he could have made his other one A. I have three internal SSDs, I could leave the OS on C, and change the other two to A & B. But I won’t do it – too many references to the way they are now (plus 6 externals whose letters would change, too).
Leo,
Using Macrium Reflect (this tip may apply to version 5 but not earlier), there is a simpler way to upgrade your boot drive: use Reflect’s disk cloning feature. I replaced a 500GB HDD in my laptop with a Samsung 830 256GB SSD as follows:
1. Attach the SSD via USB port – many SSD drives can be purchased with a “laptop upgrade kit” option for a few extra bucks. Forget the included software and just use the little cable that goes from the SSD bare drive to a USB port on your computer. You can also buy this type of cable as a separate item, but you may have trouble finding mounting spacers if you need one to snugly install an ultra-thin 7 mm SSD in a laptop.
2. Fire up Macrium Reflect, make sure your boot drive is selected, then click on the “Clone this disk” option. As Leo said, Macrium handles disk size differences up or down so long as all your files will fit the new drive.
3. When the cloning operation is done, replace the old drive with the new one and boot up. Done.
Also used the exact same procedure to install a 250GB Samsung 840 in my primary desktop system. Cloning worked with absolutely no issues both times. Made the full image backups I did seem like just an exercise in over-caution. :-)
Hello, No mention that SSD need to be connected to an AHCI, in order to get it to Boot a small change to the registry is required. I have Windows 7 and a Asus motherboard – M4A88TD-V
My problem is when changing the SATA ports(5) in BIOS 4ports change to AHCI. Other peripherals like IDE